Difference between revisions of "How to install Openstack Newton"
| (3 intermediate revisions by the same user not shown) | |||
| Line 1: | Line 1: | ||
| − | For this tutorial, we will be installing Openstack Newton on Ubuntu 16.04 (Xenial). You can use the same tutorial also on Debian 8 (Jessie) but this will install Openstack Mitaka. | + | For this tutorial, we will be installing Openstack Newton on Ubuntu 16.04 (Xenial). You can use the same tutorial also on Debian 8 (Jessie) but this will install Openstack Mitaka. If you want to start to learn Openstack, this tutorial can help you. |
==Prerequisites== | ==Prerequisites== | ||
| Line 13: | Line 13: | ||
* Compute Node: 1 processor, 2 GB memory, and 10 GB storage | * Compute Node: 1 processor, 2 GB memory, and 10 GB storage | ||
| − | + | IN this tutorial I am using: | |
* Controller Node: 2 processors, 16 GB memory, 2x250GB disks in a Raid1 configuration and 2 NIC's (eno1 and eno2) | * Controller Node: 2 processors, 16 GB memory, 2x250GB disks in a Raid1 configuration and 2 NIC's (eno1 and eno2) | ||
| Line 425: | Line 425: | ||
password = cubswin:) | password = cubswin:) | ||
| + | |||
| + | [[file:testping1.png]] | ||
* Scenario 2 | * Scenario 2 | ||
| Line 440: | Line 442: | ||
click on compute - instances and then click on the name of green-1 or green-2 and click on console.If you select green-1 ping green-2 IP address if you select green-2 ping green-1 IP address. | click on compute - instances and then click on the name of green-1 or green-2 and click on console.If you select green-1 ping green-2 IP address if you select green-2 ping green-1 IP address. | ||
| + | |||
| + | [[file:testping2.png]] | ||
* Scenario 3 | * Scenario 3 | ||
| Line 585: | Line 589: | ||
=====Tessting===== | =====Tessting===== | ||
| − | + | From any of the instance, ping Gogole DNS 8.8.8.8 | |
[[file:testping3.png]] | [[file:testping3.png]] | ||
We see that the instances are able to access the Internet but the problem here is that we can not access the instances from out site the local network. To resolve this we need floating IP's | We see that the instances are able to access the Internet but the problem here is that we can not access the instances from out site the local network. To resolve this we need floating IP's | ||
| + | |||
==Floating IP's== | ==Floating IP's== | ||
To add floating IP to an instance, click on the down arrow in front on "create Snapshot" and click on "Associate floating IP". in the new windows where it says select an IP address, click on the + sign. The next window should default to the provider pool just click on "Allocate IP" and then "Associate". In my case I have decided to allocate a floating IP to instance red-1. See image below. | To add floating IP to an instance, click on the down arrow in front on "create Snapshot" and click on "Associate floating IP". in the new windows where it says select an IP address, click on the + sign. The next window should default to the provider pool just click on "Allocate IP" and then "Associate". In my case I have decided to allocate a floating IP to instance red-1. See image below. | ||
| Line 725: | Line 730: | ||
=Conclusion= | =Conclusion= | ||
| + | This put end to our basic Openstack Newton tutorial. With this tutorial, you can start running your Openstack environment and learn Openstack. Note that Openstack is a big and complex project. This tutorial did convert only the basic. There is a lot into the Openstack project. I just wanted to share this with people that are willing to learn Openstack and don't know where to start. | ||
=References= | =References= | ||
Latest revision as of 01:36, 16 October 2018
For this tutorial, we will be installing Openstack Newton on Ubuntu 16.04 (Xenial). You can use the same tutorial also on Debian 8 (Jessie) but this will install Openstack Mitaka. If you want to start to learn Openstack, this tutorial can help you.
Prerequisites
To complete this tutorial, you'll need the following:
- 1 controller node
- 1 compute node
Hardware requirements
According to the Openstack Documentation, to run several CicrOS instances you will need:
- Controller Node: 1 processor, 4 GB memory, and 5 GB storage
- Compute Node: 1 processor, 2 GB memory, and 10 GB storage
IN this tutorial I am using:
- Controller Node: 2 processors, 16 GB memory, 2x250GB disks in a Raid1 configuration and 2 NIC's (eno1 and eno2)
- Compute Node: 2 processors, 16 GB memory, 2x350GB disks in a Raid1 configuration and 2 NIC's (eno1 and eno2)
Your environment doesn't have to have 2 disks in Raid1 configuration, 1 disk will be okay.
Networking
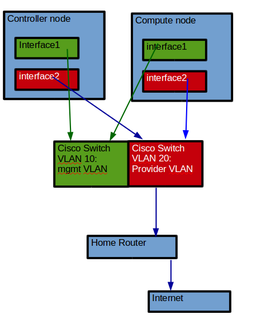
I am using a Cisco switch to setup 2 VLAN's
- manegment VLAN
- Provider VLAN ( Internet)
If you don't have a Cisco switch, you can use two 4 port switches
Controller node
Update hosts file
Make sure the node has Ubuntu 16.04 installed with all updates. If you do not have a DNS server in your environment manually update the hosts file
/etc/hosts
controller mgmt_IP_address    controller.your_domain_name      controller
compute mgmt_IP_address       computer.your_domain_name        compute
example
10.192.16.38                  controller.dfw.ppnet             controller
10.192.16.67                  compute.dfw.ppnet                computer
In my case I have a DNS server in my environement so my /etc/hosts file looks like this:
127.0.0.1       localhost
10.192.16.38     controller.dfw.ppnet   controller
# The following lines are desirable for IPv6 capable hosts
::1     localhost ip6-localhost ip6-loopback
ff02::1 ip6-allnodes
ff02::2 ip6-allrouters
update Interface
In my environment I have a DHCP server and a DNS server on the lab network and all the install on the lab network are done by pxe boot and a preseed file that auto configure my first network interface. My interface file looks like the one below. If you do not have a DHCP or DNS server you can do this manually.
# The primary network interface
auto eno1
iface eno1 inet static
       address 10.192.16.38
       netmask 255.255.252.0
       network 10.192.16.0
       broadcast 10.192.19.255
       gateway 10.192.16.1
       # dns-* options are implemented by the resolvconf package, if installed
       dns-nameservers 10.192.16.2 10.192.16.4
       dns-search dfw.ppnet
# The secondery network interface
auto eno2
iface eno2 inet static
       address 10.192.0.75
       network 10.192.0.0
       netmask 255.255.255.0
Compute node
Update hosts file
Make sure the node has Ubuntu 16.04 installed with all updates. If you do not have a DNS server in your environment manually update the hosts file
/etc/hosts
controller mgmt_IP_address    controller.your_domain_name      controller
compute mgmt_IP_address       computer.your_domain_name        compute
example
10.192.16.38                  controller.dfw.ppnet             controller
10.192.16.67                  compute.dfw.ppnet                computer
In my case I have a DNS server in my environement so my /etc/hosts file looks like this:
127.0.0.1       localhost
10.192.16.67     compute.dfw.ppnet   compute
# The following lines are desirable for IPv6 capable hosts
::1     localhost ip6-localhost ip6-loopback
ff02::1 ip6-allnodes
ff02::2 ip6-allrouters
Update interface
# The primary network interface
 auto eno1
 iface eno1 inet static
       address 10.192.16.67
       netmask 255.255.252.0
       network 10.192.16.0
       broadcast 10.192.19.255
       gateway 10.192.16.1
       # dns-* options are implemented by the resolvconf package, if installed
       dns-nameservers 10.192.16.2 10.192.16.4
       dns-search dfw.ppnet
# The secondery network interface
auto eno2
iface eno2 inet static
       address 10.192.0.73
       network 10.192.0.0
       netmask 255.255.255.0
Testing Network
From you controller node ping the compute node
ping compute.dfw.ppnet
PING compute.dfw.ppnet (10.192.16.67) 56(84) bytes of data.
64 bytes from compute.dfw.ppnet (10.192.16.67): icmp_seq=1 ttl=64 time=0.286 ms
64 bytes from compute.dfw.ppnet (10.192.16.67): icmp_seq=2 ttl=64 time=0.213 ms
64 bytes from compute.dfw.ppnet (10.192.16.67): icmp_seq=3 ttl=64 time=0.209 ms
64 bytes from compute.dfw.ppnet (10.192.16.67): icmp_seq=4 ttl=64 time=0.216 ms
From your compute node ping the controller node
ping controller.dfw.ppnet
PING controller.dfw.ppnet (10.192.16.38) 56(84) bytes of data.
64 bytes from controller.dfw.ppnet (10.192.16.38): icmp_seq=1 ttl=64 time=0.206 ms
64 bytes from controller.dfw.ppnet (10.192.16.38): icmp_seq=2 ttl=64 time=0.186 ms
64 bytes from controller.dfw.ppnet (10.192.16.38): icmp_seq=3 ttl=64 time=0.166 ms
Now that our environment is ready lest move to the OpenStack installation.
Controller node installation
Login to your controller node as root and copy the script below into you root directory.
Create a repertory called controller and download and upload all the files into the directory.
- files to upload
Note: I am using password=password1 for all passwords in this tutorial. You can use a different password.
Location where you need to use a password:
- MYSQL passwword
- RabbitMQ password
- User keystone password
- User glance password
- User nova password
- User neutron password
vi install-controller-node.sh
#!/bin/bash
#If you are not using a DNS server make sure you have
#serverIP   FQDN   hostname in your /etc/hosts file
if [ "$(id -u)" != "0" ]; then
  echo "This script must be run as root" 1>&2
  exit 1
fi
PASSWORD=password1
CONFIG_DIR=/root/controller
file="99-openstack.cnf"
export DEBIAN_FRONTEND=noninteractive
debconf-set-selections <<< 'mariadb-server-10.3 mysql-server/root_password password '$PASSWORD
debconf-set-selections <<< 'mariadb-server-10.3 mysql-server/root_password_again password '$PASSWORD
echo "Enable the Openstack repository"
sleep 3
       apt -y install software-properties-common
       add-apt-repository -y cloud-archive:newton
       apt update && apt -y dist-upgrade
echo "Install the Openstack client"
sleep 3
       apt -y install python-openstackclient
echo "Start to Install Database"
sleep 3
       apt -y install mariadb-server python-pymysql
echo "Create and edit the files/etc/mysql/mariadb.conf.d/99-openstack.cnf"
cd /etc/mysql/mariadb.conf.d/
    if [ ! -f "$file" ] ; then
        # if not create the file
cat > $file << EOF
[mysqld]
bind-address = 10.192.16.38
default-storage-engine = innodb
innodb_file_per_table
max_connections = 4096
collation-server = utf8_general_ci
character-set-server = utf8
EOF
    else echo "$file existe"
    fi
echo "Restart the database service"
sleep 3
service mysql restart
echo "Start to Install RabbitMQ"
sleep 3
       apt -y install rabbitmq-server
       rabbitmqctl add_user openstack $PASSWORD
       rabbitmqctl set_permissions openstack ".*" ".*" ".*"
echo "Start to install memcached"
sleep 3
       apt -y install memcached python-memcache
echo "Edit the /etc/memcached.conf"
sleep 3
cp /etc/memcached.conf /etc/memcached.conf~
sed -i 's/127.0.0.1/10.192.16.38/g' /etc/memcached.conf
service memcached restart
echo "start to Install Keystone"
sleep 3
cat << EOF |  mysql -uroot -p$PASSWORD
#
CREATE DATABASE keystone;
GRANT ALL PRIVILEGES ON keystone.* TO 'keystone'@'localhost' \
 IDENTIFIED BY '$PASSWORD';
GRANT ALL PRIVILEGES ON keystone.* TO 'keystone'@'%' \
 IDENTIFIED BY '$PASSWORD';
#
CREATE DATABASE glance;
GRANT ALL PRIVILEGES ON glance.* TO 'glance'@'localhost' IDENTIFIED BY '$PASSWORD';
GRANT ALL PRIVILEGES ON glance.* TO 'glance'@'%' IDENTIFIED BY '$PASSWORD';
#
CREATE DATABASE nova_api;
CREATE DATABASE nova;
GRANT ALL PRIVILEGES ON nova_api.* TO 'nova'@'localhost' \
 IDENTIFIED BY '$PASSWORD';
GRANT ALL PRIVILEGES ON nova_api.* TO 'nova'@'%' \
 IDENTIFIED BY '$PASSWORD';
GRANT ALL PRIVILEGES ON nova.* TO 'nova'@'localhost' \
 IDENTIFIED BY '$PASSWORD';
GRANT ALL PRIVILEGES ON nova.* TO 'nova'@'%' \
 IDENTIFIED BY '$PASSWORD';
#
CREATE DATABASE neutron;
GRANT ALL PRIVILEGES ON neutron.* TO 'neutron'@'localhost' \
 IDENTIFIED BY '$PASSWORD';
GRANT ALL PRIVILEGES ON neutron.* TO 'neutron'@'%' \
 IDENTIFIED BY '$PASSWORD';
EOF
apt -y install keystone
mv /etc/keystone/keystone.conf /etc/keystone/keystone.conf~
cp $CONFIG_DIR/keystone.conf /etc/keystone/
su -s /bin/sh -c "keystone-manage db_sync" keystone
keystone-manage fernet_setup --keystone-user keystone --keystone-group keystone
keystone-manage credential_setup --keystone-user keystone --keystone-group keystone
keystone-manage bootstrap --bootstrap-password $PASSWORD \
 --bootstrap-admin-url http://controller:35357/v3/ \
 --bootstrap-internal-url http://controller:35357/v3/ \
 --bootstrap-public-url http://controller:5000/v3/ \
 --bootstrap-region-id RegionOne
echo "Start Apache configuration"
sleep 3
You need to change what is in red in the script to match your environment.
Before running the script
There are some settings that needs to changed first in some of the files we upload to the /root/controller/ repertory. If you kept the password to password1 just change the ip address to reflect your environment.
Navigate to the controller repertory
cd controller
lets start with the file keystone.conf.if you changed the default password in the controller-node.sh you need to change it also on line 643.
643 connection = mysql+pymysql://keystone:password1@controller/keystone
The next file is the glance-api.conf. if the password was changed too in the controller-node.sh use the same password on line 1735 and line 3190
1735 connection = mysql+pymysql://glance:password1@controller/glance
---
3190 password = password1
Next file: glance-registry.conf on line 1025 and line 1138
1025 connection = mysql+pymysql://glance:password1@controller/glance
---
1138 password = password1)
Next file nova.conf on line 10,12,23,45,53 and 54. line 12,53 and 54 are the controller management ip address (first nic interface)
10 transport_url = rabbit://openstack:password1@controller
---
12 my_ip = 10.192.16.38
---
23 connection = mysql+pymysql://nova:password1@controller/nova_api
45 password = password1
53 vncserver_listen = 10.192.16.38
54 vncserver_proxyclient_address = 10.192.16.38
Next file: linuxbridge_agent.ini
143 physical_interface_mappings = provider:eno2 #Your provider Interface node (This should be the second interface)
---
197 local_ip = 10.192.16.38
Now that we have made all the changes we can start our script. first make the script excutable
chmod +x controller-node.sh
Run the script and seat back
./controller-node.sh
OpenStack dashboard (Horizon) login
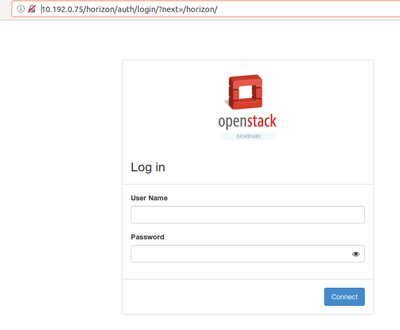
After the script complete with no error, login to the horizon by typing your_controller_IP_Address/horizon into your browser. In my case i am using the 10.192.0.0/24 network address to access horizon since the computer I am using for this tutorial is on that network.
http://10.192.0.75/horizon/
You have 2 options here to login: login with the user admin or with the user demo with the password you set. In my case i am going to use user=admin and password=password1. After login you will get to the page below.
Navigate to Admin - system information - Compute Services . As show in the image below, there are no compute services running for now from the compute node. We are going to install the compute node in the next section.
Compute node installation
Login to your compute node as root and copy the script below into you root directory.
Create a repertory called compute to your root directory and download and upload all the files into the directory.
- files to upload
For the compute node, I am using also password=password1. You can change this with your own password.
vi install-compute-node.sh
#!/bin/bash
if [ "$(id -u)" != "0" ]; then
  echo "This script must be run as root" 1>&2
  exit 1
fi
PASSWORD=password1
CONFIG_DIR=/root/compute
echo "Enable the Openstack repository"
sleep 3
       apt -y install software-properties-common
       add-apt-repository -y cloud-archive:newton
       apt update && apt -y dist-upgrade
echo "Install the Openstack client"
sleep 3
       apt -y install python-openstackclient
echo "Install libvirt-bin"
sleep 3
       sudo apt-get -y install libvirt-bin
##Install nova compute
echo "Start to Install Nova"
sleep 3
       apt-get install -y nova-compute
       mv /etc/nova/nova.conf /etc/nova/nova.conf~
       cp $CONFIG_DIR/nova.conf /etc/nova
       chown nova:nova /etc/nova/nova.conf
       service nova-compute restart
sleep 3
##neutron installation
echo "Install the network components"
sleep 3
apt install -y neutron-linuxbridge-agent
mv /etc/neutron/neutron.conf /etc/neutron/neutron.conf~
cp $CONFIG_DIR/neutron.conf /etc/neutron/neutron.conf
chown root:neutron /etc/neutron/neutron.conf
mv /etc/neutron/plugins/ml2/linuxbridge_agent.ini /etc/neutron/plugins/ml2/linuxbridge_agent.ini~
cp $CONFIG_DIR/linuxbridge_agent.ini /etc/neutron/plugins/ml2/linuxbridge_agent.ini
service nova-compute restart
sleep 3
service neutron-linuxbridge-agent restart
sleep 3
Before running the script
There are some settings that needs to changed first in some of the files we upload to the /root/compute/ repertory like we did in the /root/controller repectory before running the script. If you kept the password to password1 just change the ip address to reflect your environment and.
Navigate to the compute repertory
cd compute
We are going to start with the nova.conf file
on all the lines below, change the password to match your password if you change the password
40 password = password1
9 transport_url = rabbit://openstack:password1@controller
13 my_ip = 10.192.16.67  #your compute node management IP address
45 vncserver_proxyclient_address = 10.192.16.67 #your compute management IP address
61 password = password1
55 auth_type = password1
61 password = password1
63 #metadata_proxy_shared_secret = password1
The next file is neutron.conf
line 7,810,815 change the password to match your password
7 transport_url = rabbit://openstack:password1@controller
810 auth_type = password
815 password = password1
The last file is the linuxbridge_agent.ini file
143 physical_interface_mappings = provider:eno2  #change eno2 to the name of you second interface
197 local_ip = 10.192.16.67 #your compute mgmt IP address
Login back to contoller node and check the system information page again.
Working with Operstack
We have setup the controller node and the compute node. We have also 2 active users (admin and demo) we are going to start working on creating some test instances.
Creating Instances
- Scenario 1
Create 2 networks the first one with the name NET1 and subnet name private1 with network 192.168.0.0/24. The second one with the name NET2 and subnet name private2 with network 192.168.1.0/24.
Create 2 instances red1 and red2 and use the private1 network. Create 2 instances blue1 and blue2 and use the private2 network for those.
- Create networks
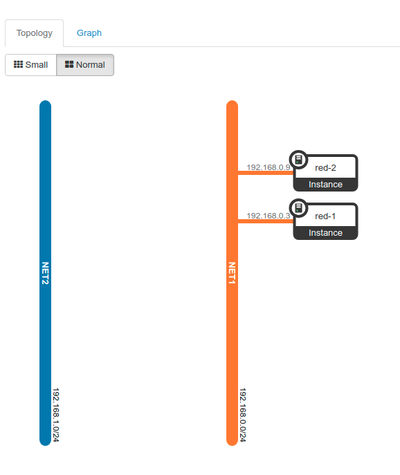
We are going to use the user demo to complete scenario1. Login as user demo and click on network - networks. on the right corner click on "Create Network" on the new window, type the next of the network and click on next, enter the subnet name and the network address. click on next and create. Repete the same process to create NET2. Once done your network should look like the one below.
- Create instances
Click on Compute - instances. On the right corner click on "Lunch instance". On the new window, enter the instance name (red), in the count field, make sure you have 2, click on next. For now we are going to use the default image (cirros). under the available images section, click on the + sign in front of the cirros image to add the image. click on next, for the flavor we are going to use the default flavor as well. Once done, click on lunch and you should have something like the image below.
- Testing that red-1 can communicate with red-2
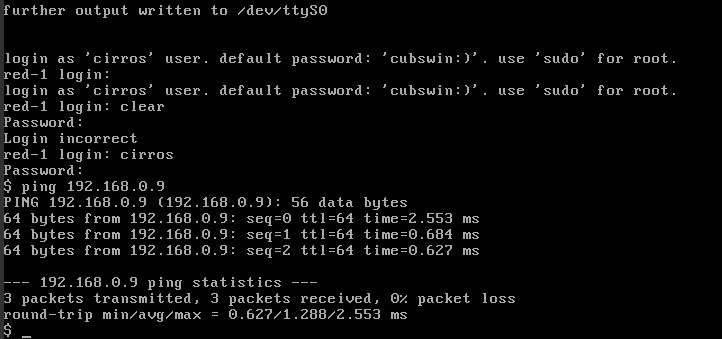
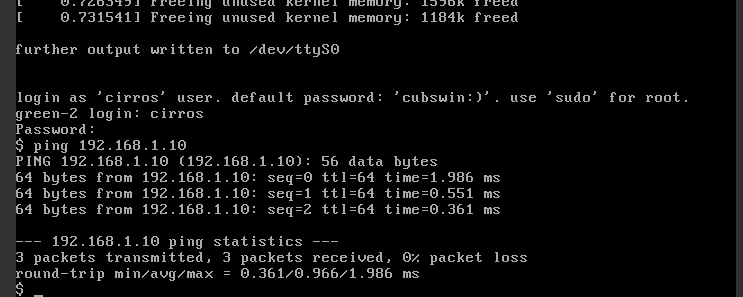
click on compute - instances and then click on the name of red-1 or red-2 and click on console. If you select red-1 ping red-2 IP address if you select red-2 ping red-1 IP address.
The default username and password for the cirros image is:
username = cirros
password = cubswin:)
- Scenario 2
Navigate to network and click network topology
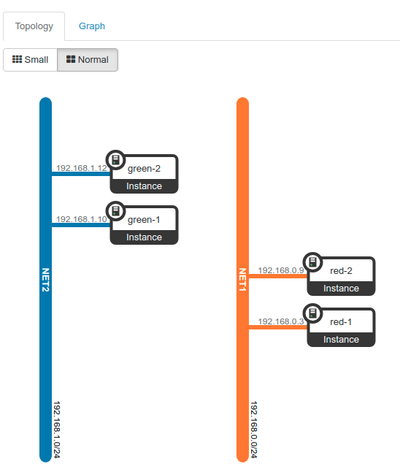
We can see that we have 2 instances running on NET1 and we have tested that both instances can communicate. Now we are going to create 2 other instances using NET2. We will call those instances green-1 and green- 2. The process is the same as in scenario 1 creating instance.We are just changing the network.
- Testing that green-1 can communicate with green-2
click on compute - instances and then click on the name of green-1 or green-2 and click on console.If you select green-1 ping green-2 IP address if you select green-2 ping green-1 IP address.
- Scenario 3
Navigate to network and click network topology
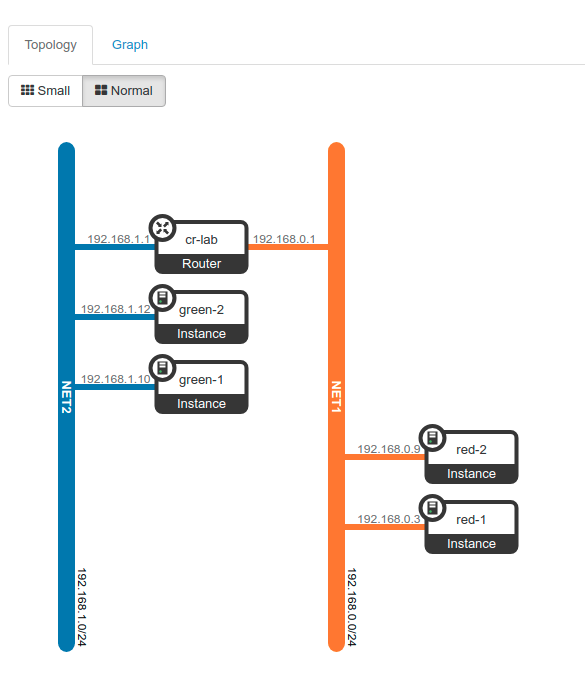
We now have instances running on NET1 and NET2 but there is no way for instances in NET1 to communicate with instances in NET2. To be able to connect both networks, we will need a router same as in a physical network.
Creating a router
Click on Network - routers and create router and enter the name of the router ( cr-lab) and click on create router.
Setup router interfaces
Click on the router name (cr-lab), navigate to the interfaces tab and click on add interfaces. In the subnet section, select NET1 and click on submit. Repeat the same process but this time select NET2.
Go again to the network topology
The image above shows now that both networks are connected and all instances are reachable. You can verify by ping for example green-1 from red-1.
The problem we have now is that no instances can reach the Internet. to resolve this problem, we need to set-up a default gateway on the router.
Setup router gateway
Before we setup the default gateway, we need to create first a new network that we are going to call the provider network. The provide network will pull it's IP addresses from our main router ( home router under 10.192.0.0/24)
Create provider network
To create the provide network, you have have 2 options
- Option 1: use the script below
#!/bin/bash
  ##Installing the provider network
  source /root/admin-openrc.sh
  openstack network create  --share --external \
    --provider-physical-network provider \
    --provider-network-type flat provider
  openstack subnet create --network provider \
   --allocation-pool start=10.192.0.130,end=10.192.0.135 \
   --dns-nameserver 10.192.0.1 --gateway 10.192.0.1 \
   --subnet-range 10.192.0.0/24 provider
Make the script executable and run the script. See out put below
root@controller:~# ./network_config.sh
+---------------------------+--------------------------------------+
| Field                     | Value                                |
+---------------------------+--------------------------------------+
| admin_state_up            | UP                                   |
| availability_zone_hints   |                                      |
| availability_zones        |                                      |
| created_at                | 2018-10-15T03:58:30Z                 |
| description               |                                      |
| headers                   |                                      |
| id                        | 2c6b8ef3-5a66-4458-a691-89c4dc9cd797 |
| ipv4_address_scope        | None                                 |
| ipv6_address_scope        | None                                 |
| is_default                | False                                |
| mtu                       | 1500                                 |
| name                      | provider                             |
| port_security_enabled     | True                                 |
| project_id                | 9c1f3e088c9348a78aa3551cba9b34b6     |
| project_id                | 9c1f3e088c9348a78aa3551cba9b34b6     |
| provider:network_type     | flat                                 |
| provider:physical_network | provider                             |
| provider:segmentation_id  | None                                 |
| revision_number           | 4                                    |
| router:external           | External                             |
| shared                    | True                                 |
| status                    | ACTIVE                               |
| subnets                   |                                      |
| tags                      | []                                   |
| updated_at                | 2018-10-15T03:58:30Z                 |
+---------------------------+--------------------------------------+
+-------------------+--------------------------------------+
| Field             | Value                                |
+-------------------+--------------------------------------+
| allocation_pools  | 10.192.0.130-10.192.0.135            |
| cidr              | 10.192.0.0/24                        |
| created_at        | 2018-10-15T03:58:32Z                 |
| description       |                                      |
| dns_nameservers   | 10.192.0.1                           |
| enable_dhcp       | True                                 |
| gateway_ip        | 10.192.0.1                           |
| headers           |                                      |
| host_routes       |                                      |
| id                | f920fd85-4794-4305-b99c-888610dbbfc1 |
| ip_version        | 4                                    |
| ipv6_address_mode | None                                 |
| ipv6_ra_mode      | None                                 |
| name              | provider                             |
| network_id        | 2c6b8ef3-5a66-4458-a691-89c4dc9cd797 |
| project_id        | 9c1f3e088c9348a78aa3551cba9b34b6     |
| project_id        | 9c1f3e088c9348a78aa3551cba9b34b6     |
| revision_number   | 2                                    |
| service_types     | []                                   |
| subnetpool_id     | None                                 |
| updated_at        | 2018-10-15T03:58:32Z                 |
+-------------------+--------------------------------------+
- Option 2: use the dashboard
For the dashboard option, you need to be login as a user that has admin rights. once login, go to admin - networks then click on create network.
name = provider
project = admin
provider network type = flat
Segmentation ID = 1
check the box shared and external network
and click on submit.
Next step is to assign a subnet to the network. Click on the name of the network and go to the subnets tab and click on create subnet.
subnet name = provider
network address = 10.192.0.0/24
click on next
Allocation pool = 10.192.0.130,10.192.0.135
DNS names servers = 10.192.0.1
Host routes = 10.192.0.1
once done click on create
Setup gateway
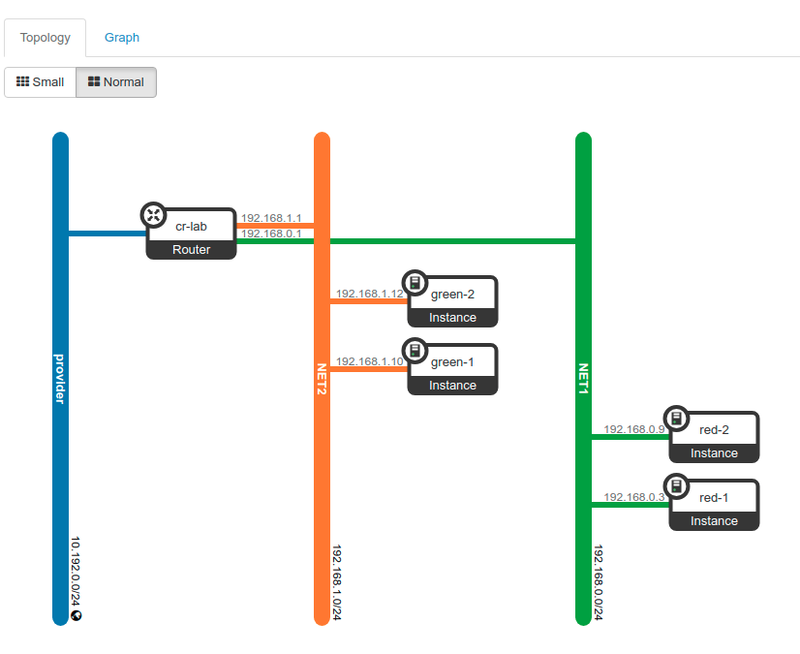
Login back with the demo user. click on network - routers -set gateway. In the external network section select provider. Go to network topology, you will see that the router is now connected to the provider network with an IP in the 10.192.0.0./24 network between 10.192.0.130 and 10.192.0.135
Tessting
From any of the instance, ping Gogole DNS 8.8.8.8
We see that the instances are able to access the Internet but the problem here is that we can not access the instances from out site the local network. To resolve this we need floating IP's
Floating IP's
To add floating IP to an instance, click on the down arrow in front on "create Snapshot" and click on "Associate floating IP". in the new windows where it says select an IP address, click on the + sign. The next window should default to the provider pool just click on "Allocate IP" and then "Associate". In my case I have decided to allocate a floating IP to instance red-1. See image below.
Since the floating IP is coming from the 10.192.0.0/24 network which is my Home network, from any computer on that network, i will not be able to ping or SSH into the instances with the floating IP yet because of security. The default security group that is assigned to all instances dosen't allow ICMP or SSH by default. We need to modify the default security group or create a new security group to allow ICMP and SSH. For this tutorial, I will just modify the default security group.
ICMP and SSH
Navigate to "Access & Security" click on Add rule for:
- ICMAP
Rule = ALL ICMP        #allow ping
CIDR = 10.192.0.0./24  #from any computer on the 10.192.0.0/24 network
- SSH
Rule = SSH            #allow SSH
CIDR = 10.192.0.0/24  #from any computer on the 10.192.0.0.24 network
- Ping test
ppaul@U18:~/.ssh$ ping 10.192.0.131
PING 10.192.0.131 (10.192.0.131) 56(84) bytes of data.
64 bytes from 10.192.0.131: icmp_seq=1 ttl=63 time=0.976 ms
64 bytes from 10.192.0.131: icmp_seq=2 ttl=63 time=0.801 ms
64 bytes from 10.192.0.131: icmp_seq=3 ttl=63 time=0.895 ms
64 bytes from 10.192.0.131: icmp_seq=4 ttl=63 time=0.936 ms
64 bytes from 10.192.0.131: icmp_seq=5 ttl=63 time=0.992 ms
^C
--- 10.192.0.131 ping statistics ---
5 packets transmitted, 5 received, 0% packet loss, time 4056ms
rtt min/avg/max/mdev = 0.801/0.920/0.992/0.068 ms
ppaul@U18:~/.ssh$
- SSh test
ppaul@U18:~/.ssh$ ssh cirros@10.192.0.131
$ ls -a
.             .ash_history  .shrc
..            .profile      .ssh
$
I was able to ssh into the instances because during the creation of the instance, i imported my ssh-key and added it to the instance.
Upload images
In this section, we are going to upload the Debian Stretch qcow2 image and the Ubuntu Xenial image. the process is the same so I will just convert the Debain Stretch image upload.
Download the image
Login to your controller node in the /tmp/ directory run:
Debian Stretch
root@controller:/tmp# wget https://cdimage.debian.org/cdimage/openstack/current/debian-9.5.6-20181013-openstack-amd64.qcow2
Ubuntu Xenial
root@controller:/tmp# wget https://cloud-images.ubuntu.com/releases/16.04/release/ubuntu-16.04-server-cloudimg-amd64-disk1.img
This will download the image for you.
Create the image
- Before
- After
Create a file called image_create.sh under the root directory, copy and paste the script below into the file. Make the file executable and run it.
#!/bin/bash
  source /root/admin-openrc.sh
  openstack image create \
  --container-format bare \
  --disk-format qcow2 \
  --file /tmp/debian-9.5.6-20181013-openstack-amd64.qcow2 \
  Debian-Stretch
root@controller:~# ./image_create.sh
------------------+----------------------------------------------------+
| Field            | Value                                              |
+------------------+----------------------------------------------------+
| checksum         | 26e88518ce63253543d31a2a30bcd891                   |
| container_format | bare                                               |
| created_at       | 2018-10-16T04:39:42Z                               |
| disk_format      | qcow2                                              |
| file             | /v2/images/e428c3b2-0f95-4003-83b7-6fc5135671a8/fi |
|                  | le                                                 |
| id               | e428c3b2-0f95-4003-83b7-6fc5135671a8               |
| min_disk         | 0                                                  |
| min_ram          | 0                                                  |
| name             | Debian-Stretch                                     |
| owner            | 9c1f3e088c9348a78aa3551cba9b34b6                   |
| protected        | False                                              |
| schema           | /v2/schemas/image                                  |
| size             | 641923584                                          |
| status           | active                                             |
| tags             |                                                    |
| updated_at       | 2018-10-16T04:39:45Z                               |
| virtual_size     | None                                               |
| visibility       | private                                            |
+------------------+----------------------------------------------------+
Now that we have the Debian Stretch image, we can't use it yet because this image required at less 3GB of disk space and the default flavor m1.nano has only 1GB of disk space. We need to create a new flavor with at less 4GB of disk space to work with the Debian Stretch image.
Creating flavors
Create a file called flavor_create.sh under the root directory, copy and paste the script below into the file. Make the file executable and run it.
#!/bin/bash
       source /root/admin-openrc.sh
       openstack flavor create \
        --id 1 \
        --vcpus 1 \
        --ram 64 \   #RAM size = 64MB
        --disk 4 \   #Disk size = 4GB
        m2.nano
root@controller:~# ./flavor_create.sh
+----------------------------+---------+
| Field                      | Value   |
+----------------------------+---------+
| OS-FLV-DISABLED:disabled   | False   |
| OS-FLV-EXT-DATA:ephemeral  | 0       |
| disk                       | 4       |
| id                         | 1       |
| name                       | m2.nano |
| os-flavor-access:is_public | True    |
| properties                 |         |
| ram                        | 64      |
| rxtx_factor                | 1.0     |
| swap                       |         |
| vcpus                      | 1       |
+----------------------------+---------+
Conclusion
This put end to our basic Openstack Newton tutorial. With this tutorial, you can start running your Openstack environment and learn Openstack. Note that Openstack is a big and complex project. This tutorial did convert only the basic. There is a lot into the Openstack project. I just wanted to share this with people that are willing to learn Openstack and don't know where to start.
References
https://docs.openstack.org/newton/install-guide-ubuntu/
