Difference between revisions of "Icinga2: Haproxy- master/slave setup"
| (28 intermediate revisions by the same user not shown) | |||
| Line 5: | Line 5: | ||
=Prerequisites= | =Prerequisites= | ||
1 icinga2 server: icinga1001 | 1 icinga2 server: icinga1001 | ||
| + | |||
1 master database master server: db1001 | 1 master database master server: db1001 | ||
| + | |||
1 dbproxy server: dbproxy1001 | 1 dbproxy server: dbproxy1001 | ||
| + | |||
2 slaves database severs: db1002 and db1005 | 2 slaves database severs: db1002 and db1005 | ||
| Line 19: | Line 22: | ||
[[file:icinga21.png]] | [[file:icinga21.png]] | ||
| + | |||
| + | =Haproxy setup and configuration= | ||
| + | On the dbpoxy1001, install haproxy: | ||
| + | sudo apt-get install haproxy | ||
| + | |||
| + | Open the configuration file and copy and paste the configuration below. | ||
| + | cd /etc/haproxy | ||
| + | sudo vi haproxy.cfg | ||
| + | |||
| + | # HAProxy's stats | ||
| + | listen stats | ||
| + | bind 10.192.32.8:80 | ||
| + | stats enable | ||
| + | stats hide-version | ||
| + | stats uri / | ||
| + | stats realm HAProxy Statistics | ||
| + | stats auth user_name:user_password | ||
| + | listen mysql-cluster | ||
| + | bind 0.0.0.0:3306 | ||
| + | mode tcp | ||
| + | option tcplog | ||
| + | balance roundrobin | ||
| + | option log-health-checks | ||
| + | log /dev/log local0 crit | ||
| + | option tcpka | ||
| + | option mysql-check user haproxy_user | ||
| + | server db1001 10.192.16.9:3306 check inter 3s fall 3 rise 6 | ||
| + | server db1002 10.192.32.2:3306 check backup | ||
| + | server db1005 10.192.32.2:3306 check backup | ||
| + | |||
| + | Note: change the Bind address in the "listen start" with your dbproxy IP address and the server name and IP addresses in the "listen mysql-cluster" | ||
| + | with your master and slaves names and IP addresses. If you are running UFW make sure port 3306 is open on the dbproxy node | ||
| + | |||
| + | As we can see in the haproxy.cfg file, we have a user called " haproxy_user" this user will check the status on all 3 database servers so we need to create this user.The user don't need and privileges on the database but we have to create the user on all 2 database servers. | ||
| + | |||
| + | =Database configuration= | ||
| + | ==Create the haproxy_user== | ||
| + | The user don't have to be called "haproxy_use" you can call the user anything you want. | ||
| + | login on all 3 database servers and issue the command | ||
| + | create user 'haproxy_user'@'dbproxy1001.dfw.labnet'; | ||
| + | ==Create the application user== | ||
| + | We are going to create the user that the application will use to access the database from the dbproxy node. | ||
| + | |||
| + | ===Overview=== | ||
| + | In my previous setup, I had 2 users(icinga2@icinga1001.dfw.labnet and icingaweb@icinga1001.dfw.labnet) for the icinga_ido and icingweb_ido settings. I had also 2 databases (icinga and icingaweb). | ||
| + | ====Why 2 databases and 2 users?==== | ||
| + | Icinga 2 uses 2 backend databases needed by Icinga 2 monitoring web application and Icinga Web 2 frontend to store users, contacts and other collected data. | ||
| + | in this setting I will use only one user haproxy_root@dbproxy1001.dfw.labnet with the same databases. | ||
| + | |||
| + | ===Create the user command line=== | ||
| + | |||
| + | create user 'haproxy_root'@'dbhaproxy1001.dfw.labnet'; | ||
| + | grant SELECT, UPDATE, INSERT, DELETE privileges on *.* to 'haproxy_root'@'dbproxy1001.dfw.labnet' identified by 'your_password' with grant option; | ||
| + | |||
| + | ===Create the user with yaml file=== | ||
| + | In my environment, I am using the puppetlabs/mysql module to install, setup and configure all my nodes. I have a yaml file for each database node and the setting to create the haproxy_root user using the yaml file looks like the one below. | ||
| + | |||
| + | ##application user to access mysql cluster from haproxy | ||
| + | mysql::server::users: | ||
| + | haproxy_root@dbproxy1001.dfw.labnet: | ||
| + | ensure: present | ||
| + | password_hash: '*EAA615A0970C05B84915C0772FD1C23831586837' | ||
| + | mysql::server::grants: | ||
| + | haproxy_root@dbproxy1001.dfw.labnet/*.*: | ||
| + | ensure: present | ||
| + | privileges: INSERT, UPDATE, DELETE, SELECT | ||
| + | table: '*.*' | ||
| + | user: haproxy_root@dbproxy1001.dfw.labnet | ||
| + | |||
| + | =Verification= | ||
| + | Go to your dbproxy stats page by typing your_server_ip_address in the browser | ||
| + | |||
| + | [[file:icinga22.png]] | ||
| + | |||
| + | WE see that all 3 database nodes are up and only db1001 is in active mode. | ||
| + | |||
| + | =Icinga2 configuration= | ||
| + | ==Using the WEB GUI=== | ||
| + | |||
| + | - Login to Icinga with a user with Admin rights | ||
| + | |||
| + | - click on Configuration | ||
| + | |||
| + | - click on Application | ||
| + | |||
| + | - click on Resources | ||
| + | |||
| + | - click on icingaweb_ido | ||
| + | |||
| + | - change the Host to your dbproxy host name | ||
| + | |||
| + | - change username to your user allow to access the database from the dbproxy node | ||
| + | |||
| + | - change the pasword to the the password of the user allow to access the database from the dbproxy node | ||
| + | |||
| + | - click on validation configuration | ||
| + | |||
| + | - click on save changes | ||
| + | |||
| + | Do the same for the icinga_ido section | ||
| + | |||
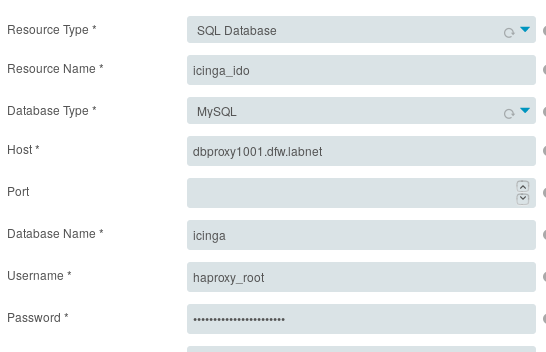
| + | icingaweb_ido | ||
| + | |||
| + | [[file:icinga23.png]] | ||
| + | |||
| + | icinga_ido | ||
| + | |||
| + | [[file:icinga24.png]] | ||
| + | |||
| + | ==Changing the ido-mysql.conf file== | ||
| + | cd /etc/icinga2/features-enabled | ||
| + | sudo vi ido_mysql.conf | ||
| + | |||
| + | library "db_ido_mysql" | ||
| + | object IdoMysqlConnection "ido-mysql" { | ||
| + | host = "dbproxy1001.dfw.labnet" | ||
| + | port = 3306 | ||
| + | user = "haproxy_root" | ||
| + | password = "password_here" | ||
| + | database = "icinga" | ||
| + | enable_ssl = false | ||
| + | } | ||
| + | |||
| + | sudo systemctl restart icinga2.service | ||
| + | |||
| + | ==changing the resources.ini file== | ||
| + | cd /etc/icingaweb2 | ||
| + | sudo vi resources.ini | ||
| + | |||
| + | [icingaweb_db] | ||
| + | type = "db" | ||
| + | db = "mysql" | ||
| + | host = "dbproxy1001.dfw.labnet" | ||
| + | port = "" | ||
| + | dbname = "icingaweb2" | ||
| + | username = "haproxy_root" | ||
| + | password = "password_here" | ||
| + | charset = "" | ||
| + | persistent = "0" | ||
| + | use_ssl = "1" | ||
| + | [icinga_ido] | ||
| + | type = "db" | ||
| + | db = "mysql" | ||
| + | host = "dbproxy1001.dfw.labnet" | ||
| + | port = "" | ||
| + | dbname = "icinga" | ||
| + | username = "haproxy_root" | ||
| + | password = "password_here" | ||
| + | charset = "" | ||
| + | persistent = "0" | ||
| + | use_ssl = "1" | ||
| + | |||
| + | =Testing= | ||
| + | We will stop MySQL on db1001 which is the master and see if we can still access the application | ||
| + | ppaul@db1001:~$ sudo systemctl stop mysql | ||
| + | |||
| + | The haproxy stats show that db1001 is offline | ||
| + | |||
| + | [[file:icinga25.png]] | ||
| + | |||
| + | But we can login to the application. We notice that the back-end is not working because the application is connected to db1002 which is a slave server set to ready only mode | ||
| + | |||
| + | [[file:icinga26.png]] | ||
Latest revision as of 01:48, 29 August 2019
In This tutorial I will be setting up Icinga2 to use a database proxy (dbproxy) to connect to it's master database and fail-over to the slave database if master database is not available for some reasons.
Note: We will not cover the Icinga2, Icingaweb2 and master/slave setup in this tutorial
Prerequisites
1 icinga2 server: icinga1001
1 master database master server: db1001
1 dbproxy server: dbproxy1001
2 slaves database severs: db1002 and db1005
Setup
Existing configuration
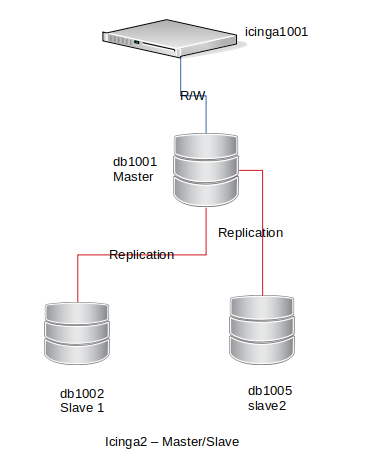
In my existing configuration, I have Icinga2 connecting directly to the database master (db1001). See image below
New configuration
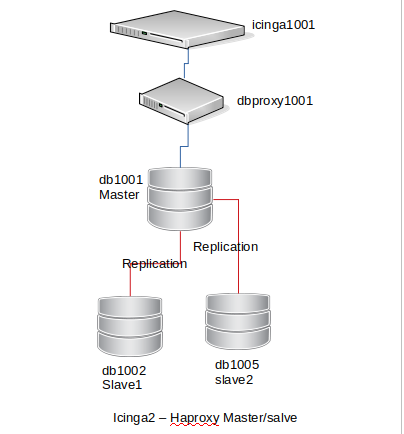
In the new configuration we will need to put a dbproxy between Icinga2 and the database master server. See image below
Haproxy setup and configuration
On the dbpoxy1001, install haproxy:
sudo apt-get install haproxy
Open the configuration file and copy and paste the configuration below.
cd /etc/haproxy
sudo vi haproxy.cfg
# HAProxy's stats
listen stats
  bind 10.192.32.8:80
  stats enable
  stats hide-version
  stats uri     /
  stats realm   HAProxy Statistics
  stats auth    user_name:user_password
listen mysql-cluster
  bind 0.0.0.0:3306
  mode tcp
  option tcplog
  balance roundrobin
  option log-health-checks
  log /dev/log local0 crit
  option tcpka
  option mysql-check user haproxy_user
  server db1001 10.192.16.9:3306 check inter 3s fall 3 rise 6
  server db1002 10.192.32.2:3306 check backup
  server db1005 10.192.32.2:3306 check backup
Note: change the Bind address in the "listen start" with your dbproxy IP address and the server name and IP addresses in the "listen mysql-cluster" with your master and slaves names and IP addresses. If you are running UFW make sure port 3306 is open on the dbproxy node
As we can see in the haproxy.cfg file, we have a user called " haproxy_user" this user will check the status on all 3 database servers so we need to create this user.The user don't need and privileges on the database but we have to create the user on all 2 database servers.
Database configuration
Create the haproxy_user
The user don't have to be called "haproxy_use" you can call the user anything you want. login on all 3 database servers and issue the command
create user 'haproxy_user'@'dbproxy1001.dfw.labnet';
Create the application user
We are going to create the user that the application will use to access the database from the dbproxy node.
Overview
In my previous setup, I had 2 users(icinga2@icinga1001.dfw.labnet and icingaweb@icinga1001.dfw.labnet) for the icinga_ido and icingweb_ido settings. I had also 2 databases (icinga and icingaweb).
Why 2 databases and 2 users?
Icinga 2 uses 2 backend databases needed by Icinga 2 monitoring web application and Icinga Web 2 frontend to store users, contacts and other collected data. in this setting I will use only one user haproxy_root@dbproxy1001.dfw.labnet with the same databases.
Create the user command line
create user 'haproxy_root'@'dbhaproxy1001.dfw.labnet';
grant SELECT, UPDATE, INSERT, DELETE privileges on *.* to 'haproxy_root'@'dbproxy1001.dfw.labnet' identified by 'your_password' with grant option;
Create the user with yaml file
In my environment, I am using the puppetlabs/mysql module to install, setup and configure all my nodes. I have a yaml file for each database node and the setting to create the haproxy_root user using the yaml file looks like the one below.
 ##application user to  access mysql cluster from haproxy
mysql::server::users:
  haproxy_root@dbproxy1001.dfw.labnet:
    ensure: present
    password_hash: '*EAA615A0970C05B84915C0772FD1C23831586837'
mysql::server::grants:
  haproxy_root@dbproxy1001.dfw.labnet/*.*:
    ensure: present
    privileges: INSERT, UPDATE, DELETE, SELECT
    table: '*.*'
    user: haproxy_root@dbproxy1001.dfw.labnet
Verification
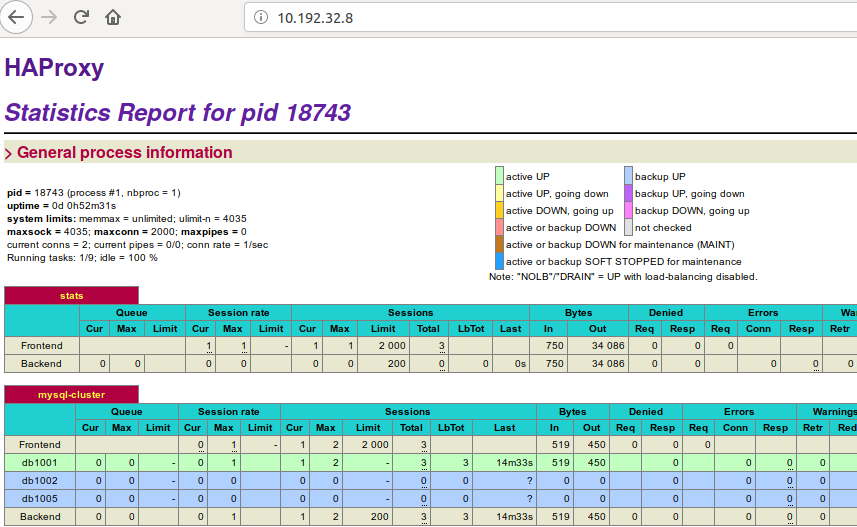
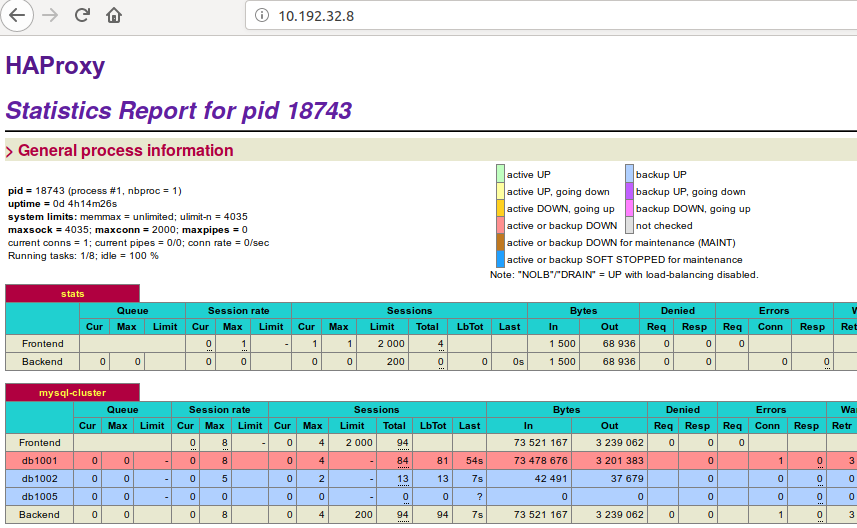
Go to your dbproxy stats page by typing your_server_ip_address in the browser
WE see that all 3 database nodes are up and only db1001 is in active mode.
Icinga2 configuration
Using the WEB GUI=
- Login to Icinga with a user with Admin rights
- click on Configuration
- click on Application
- click on Resources
- click on icingaweb_ido
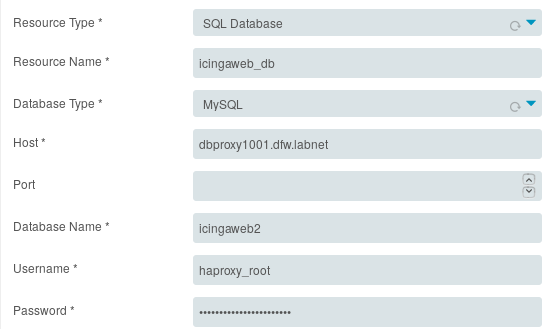
- change the Host to your dbproxy host name
- change username to your user allow to access the database from the dbproxy node
- change the pasword to the the password of the user allow to access the database from the dbproxy node
- click on validation configuration
- click on save changes
Do the same for the icinga_ido section
icingaweb_ido
icinga_ido
Changing the ido-mysql.conf file
cd /etc/icinga2/features-enabled
sudo vi ido_mysql.conf
library "db_ido_mysql"
object IdoMysqlConnection "ido-mysql" {
  host = "dbproxy1001.dfw.labnet"
  port = 3306
  user = "haproxy_root"
  password = "password_here"
  database = "icinga"
  enable_ssl = false
}
sudo systemctl restart icinga2.service
changing the resources.ini file
cd /etc/icingaweb2
sudo vi resources.ini
[icingaweb_db]
type = "db"
db = "mysql"
host = "dbproxy1001.dfw.labnet"
port = ""
dbname = "icingaweb2"
username = "haproxy_root"
password = "password_here"
charset = ""
persistent = "0"
use_ssl = "1"
[icinga_ido]
type = "db"
db = "mysql"
host = "dbproxy1001.dfw.labnet"
port = ""
dbname = "icinga"
username = "haproxy_root"
password = "password_here"
charset = ""
persistent = "0"
use_ssl = "1"
Testing
We will stop MySQL on db1001 which is the master and see if we can still access the application
ppaul@db1001:~$ sudo systemctl stop mysql
The haproxy stats show that db1001 is offline
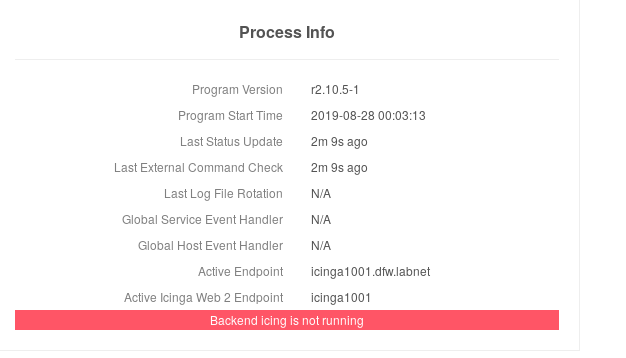
But we can login to the application. We notice that the back-end is not working because the application is connected to db1002 which is a slave server set to ready only mode
