How to install Kubernetes
ATTENTION!!! CONFIGURATION OF VERSION 1.18 and Docker version 19.03.8
In this tutorial, we will be installing Kubernetes (k8s) cluster. The cluster will have 1 master and 2 nodes.
Prerequisites
To complete this tutorial, we will need 3 nodes running Debian Stretch/Buster. This tutorial will work too on nodes running Ubuntu Xenial.
Node informations
node1 = k8s2001.tx.labnet = master node / IP address 10.64.0.14
node2 = k8s2002.tx.labnet / IP address 10.64.0.15
node3 = k8s2003.tx.labnet / IP address 10.64.0.16
make sure that all nodes can talk to each other. Like in all my turorials, I have a DHCP server and a DNS server running in my environment so no need for me to manually edit my /etc/hosts file. But, if you do not have a DHCP and DNS server in your environment, please edit your /etc/hosts file.
- master node
ppaul@k8s2001:~$ cat /etc/hosts
127.0.0.1	localhost
10.64.0.14	k8s2001.tx.labnet	k8s2001
# The following lines are desirable for IPv6 capable hosts
::1     localhost ip6-localhost ip6-loopback
ff02::1 ip6-allnodes
ff02::2 ip6-allrouters
make also sure if you are using swap to disable swap on all nodes
/etc/fstab
# UUID=aea9965a-deae-4d5a-9ad5-3fdbc449121d none swap sw 0 0
K8s Installation
Create a file called k8s_install.sh on all nodes and copy and paste the script below into the file.save the file and make the file executable. This script will install docker and K8s on all nodes
vi k8s_install.sh
#!/bin/bash
sudo swapoff -a
# Install Docker
sudo apt-get install apt-transport-https ca-certificates curl software-properties-common -y
sudo curl -fsSL https://download.docker.com/linux/debian/gpg | apt-key add -
sudo add-apt-repository "deb [arch=amd64] https://download.docker.com/linux/debian $(lsb_release -cs) stable"
sudo apt-get update -y
sudo apt-get install docker-ce -y
# Install kubernetes
sudo curl -s https://packages.cloud.google.com/apt/doc/apt-key.gpg | apt-key add -
sudo echo 'deb http://apt.kubernetes.io/ kubernetes-xenial main' | sudo tee /etc/apt/sources.list.d/kubernetes.list
apt-get update -y
apt-get install kubelet kubeadm kubectl -y
If the installation complete with no problem, move to the next step to configure the master node.
K8s Configuration
All the configurations are done on the master node (k8s2001.tx.labnet). Once the configurations are done then we can move on to the other nodes to join them to the cluster.
On the master node
Login to your master node.This first step on configuring the master node is to initialize the cluster by using the master node IP address. The command is :
sudo kubeadm init --pod-network-cidr=192.168.0.0/16 --apiserver-advertise-address=10.64.0.14
You can use any given IP address for the pod-network-cider, I just pick 19.168.0.0/16. 10.64.0.14 is the IP address of the master node. After running the command you will have the output below.
Your Kubernetes master has initialized successfully!
To start using your cluster, you need to run the following as a regular user:
 mkdir -p $HOME/.kube
 sudo cp -i /etc/kubernetes/admin.conf $HOME/.kube/config
 sudo chown $(id -u):$(id -g) $HOME/.kube/config
You should now deploy a pod network to the cluster.
Run "kubectl apply -f [podnetwork].yaml" with one of the options listed at:
 https://kubernetes.io/docs/concepts/cluster-administration/addons/
You can now join any number of machines by running the following on each node
as root:
 kubeadm join 10.64.0.14:6443 --token hfz0k8.aq3mjh0eng2nrlo5 --discovery-token-ca-cert-hash
sha256:b9045fb51c6b177cbc58e19e1a193dd07131eb8f6b08d553d11c20b10f1e3295
The line in red is very important. You will be using this command to join the other nodes to the cluster. It is best to copy and save this line somewhere in case you need to join more node to the cluster.
As instructed by the output, we need to run the 3 comamnds below before we start using the cluster
mkdir -p $HOME/.kube
sudo cp -i /etc/kubernetes/admin.conf $HOME/.kube/config
sudo chown $(id -u):$(id -g) $HOME/.kube/config
After running the 3 commands above, issue
kubectl get nodes
ppaul@k8s2001:~$ kubectl get node
NAME      STATUS   ROLES    AGE   VERSION
k8s1001   NotReady master   36h   v1.18.2
We can see that the status of the master is NotReady. The reason being that the cluster doesn't have a Container Networking Interface or CNI.
kubectl apply -f https://docs.projectcalico.org/v3.9/manifests/calico.yaml
Now issue again the command kubectl get nodes
ppaul@k8s2001:~$ kubectl get nodes
NAME      STATUS   ROLES    AGE   VERSION
k8s1001   Ready    master   36h   v1.18.2
Our cluster is up and running but not ready yet. The last command to issue to check that everything is up and running is
kubectl get pods --all-namespaces

ppaul@k8s2001:~$ kubectl get pods --all-namespaces
NAMESPACE              NAME                                         READY   STATUS    RESTARTS   AGE
kube-system            calico-kube-controllers-6fcbbfb6fb-68nv4     1/1     Running   0          36h
kube-system            calico-node-gdhzg                            1/1     Running   0          16h
kube-system            calico-node-kmqbv                            1/1     Running   0          17h
kube-system            calico-node-xrs9b                            1/1     Running   0          36h
kube-system            coredns-66bff467f8-hjfzk                     1/1     Running   0          36h
kube-system            coredns-66bff467f8-tvt4v                     1/1     Running   0          36h
kube-system            etcd-k8s1001                                 1/1     Running   0          36h
kube-system            kube-apiserver-k8s1001                       1/1     Running   0          36h
kube-system            kube-controller-manager-k8s1001              1/1     Running   2          36h
kube-system            kube-proxy-6npm5                             1/1     Running   0          16h
kube-system            kube-proxy-78v7f                             1/1     Running   0          17h
kube-system            kube-proxy-rq5qt                             1/1     Running   0          36h
kube-system            kube-scheduler-k8s1001                       1/1     Running   1          36h
Now that everything is running, we can go the the next step: Configure dashboard.
Dashboard Installation
The command to install the dashboard on version 1.12 and version 1.18 is different.
On version 1.12
kubectl apply -f https://raw.githubusercontent.com/kubernetes/dashboard/v1.10.1/src/deploy/recommended/kubernetes-dashboard.yaml

ppaul@k8s2001:~$ kubectl apply -f https://raw.githubusercontent.com/kubernetes/dashboard/v1.10.1/src/deploy/recommended/kubernetes-dashboard.yaml
secret/kubernetes-dashboard-certs created
serviceaccount/kubernetes-dashboard created
role.rbac.authorization.k8s.io/kubernetes-dashboard-minimal created
rolebinding.rbac.authorization.k8s.io/kubernetes-dashboard-minimal created
deployment.apps/kubernetes-dashboard created
service/kubernetes-dashboard created
On version 1.18
kubectl apply -f https://raw.githubusercontent.com/kubernetes/dashboard/v2.0.0/aio/deploy/recommended.yaml
Dashboard Configuration
On version 1.12 Let us configure our Dashboard so we can have full admin permission. First we need to create a yaml file and use the yaml file to setup admin permission on the dashboard. Create a file named dashboard.yaml. and paste the content below into the file, save, close the file and make it executable.
vi dashboard.yaml
file
apiVersion: rbac.authorization.k8s.io/v1beta1
kind: ClusterRoleBinding
metadata:
   name: kubernetes-dashboard
   labels:
     k8s-app: kubernetes-dashboard
roleRef:
   apiGroup: rbac.authorization.k8s.io
   kind: ClusterRole
   name: cluster-admin
subjects:
-  kind: ServiceAccount
   name: kubernetes-dashboard
   namespace: kube-system
once the yaml file ready, run : kubectl create -f dashboard.yaml
ppaul@k8s2001:~$ kubectl create -f dashboard.yaml
clusterrolebinding.rbac.authorization.k8s.io/kubernetes-dashboard created
On version 1.18
Create a file called service_admin.yaml and paste the content below in the file
 apiVersion: v1
kind: ServiceAccount
metadata:
  name: ppadmin
  namespace: kube-system
---
apiVersion: rbac.authorization.k8s.io/v1beta1
kind: ClusterRoleBinding
metadata:
  name: ppadmin
roleRef:
  apiGroup: rbac.authorization.k8s.io
  kind: ClusterRole
  name: cluster-admin
subjects:
- kind: ServiceAccount
  name: ppadmin
  namespace: kube-system
The file defines an administrator service account and a clusterrolebinding, both called ppadmin. You can call it anything you want.
Run
kubectl apply -f service_admin.yaml
Output
ppaul@k8s3001:~$ kubectl apply -f service_account.yaml
serviceaccount/ppadmin created
clusterrolebinding.rbac.authorization.k8s.io/ppadmin created
We will use the ppadmin service account to connect to the Kubernetes dashboard.
Access Dashboard
On versio 1.12 To be able to access the dashboard, we need to enable proxy on the master bu issuing the command below
sudo nohup kubectl proxy --address="10.64.0.14" -p 443 --accept-hosts='^*$' &
10.64.0.14 being the master node IP address
Note: if you are running UFW make sure tcp/443 is open on the node.
Open a browser and type in the URL below to access the dashboard
http://10.64.0.14:443/api/v1/namespaces/kube-system/services/https:kubernetes-dashboard:/proxy/#!/overview?namespace=default
On version 1.18 Obtain an authentication token for the ppadmin service account by entering:
kubectl -n kube-system describe secret $(kubectl -n kube-system get secret | grep ppadmin | awk '{print $1}')
on the node running the dashboard (k8s1001), run
kubectl proxy
Starting to serve on 127.0.0.1:8001
on your local, personal computer port forward the proxy port (usually 8001) so that you can access it from localhost
ssh -L 8001:localhost:8001 ppaul@k8s1001.dfw.labnet
You should now be able to access the dashboard using your browser at
http://localhost:8001/api/v1/namespaces/kubernetes-dashboard/services/https:kubernetes-dashboard:/proxy/#/login
Copy and paste the token you obtained for the ppadmin service account
Now that we have the master ready, it is time to join the first node. Everything from here below is the same as for version 1.12 and version 1.18
Join node to cluster
Before we join the first node, lets check the node status on the master.
ppaul@k8s2001:~$ kubectl get nodes
NAME      STATUS   ROLES    AGE   VERSION
k8s2001   Ready    master   94m   v1.12.2
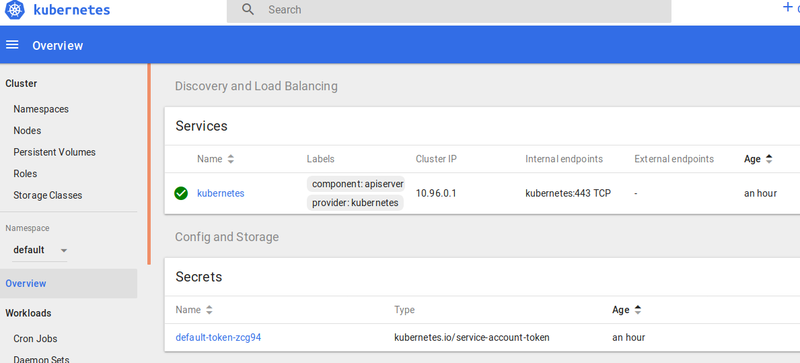
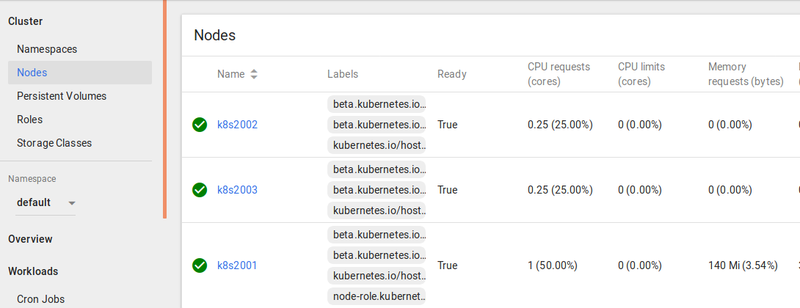
We see that we have only the master for now. same output when using the dashboard.
 '
'
Login to your first node (k8s2002.tx.labnet) and issue the command below
Note: if you are running UFW make sure that tcp/6443 is open on the master node otherwise, the node will not be able to join the cluster.
sudo kubeadm join 10.64.0.14:6443 --token hfz0k8.aq3mjh0eng2nrlo5 --discovery-token-ca-cert-hash
sha256:b9045fb51c6b177cbc58e19e1a193dd07131eb8f6b08d553d11c20b10f1e3295
Output
This node has joined the cluster:
* Certificate signing request was sent to apiserver and a response was received.
* The Kubelet was informed of the new secure connection details.
Run 'kubectl get nodes' on the master to see this node join the cluster.
login to your second node (k8s2003.tx.labnet) and perform the same step as k8s2002.
on the master
ppaul@k8s2001:~$ kubectl get nodes
NAME      STATUS   ROLES    AGE    VERSION
k8s2001   Ready    master   151m   v1.12.2
k8s2002   Ready    <none>   42s    v1.12.2
k8s2003   Ready    <none>   42s    v1.12.2
Now that we have joined our node to the cluster, let us test by creating Nginx container.
Testing
Firewall
Before creating any deployment, if you are running UFW, make sure tcp/6666 is open on the master node otherwise your deployment with be sucked at "ContainerCreating"
hello-world-6db874c846-b256n 0/1 ContainerCreating 0 7s
All is done from the master node. The first command we need to run to deploy Nginx container is;
kubectl create deployment nginx --image=nginx
you can choose any deployment name if you want and it can be websrv, web. It doesn't have to be nginx as deployment name. We discuss more about the command later and how to use also the GUI (Dashboard to deploy)
ppaul@k8s2001:~$ kubectl create deployment nginx --image=nginx
deployment.apps/nginx created
Then issue kubectl get deployments to list all deployments right now we have only one deployment (nginx)
ppaul@k8s2001:~$ kubectl get deployments
NAME    DESIRED   CURRENT   UP-TO-DATE   AVAILABLE   AGE
nginx   1         1         1            1           58s
You can also issue : kubectl describe deployment nginx to have more information about the deployment
ppaul@k8s2001:~$ kubectl describe deployment nginx
Name:                   nginx
Namespace:              default
CreationTimestamp:      Mon, 05 Nov 2018 22:21:42 -0600
Labels:                 app=nginx
Annotations:            deployment.kubernetes.io/revision: 1
Selector:               app=nginx
Replicas:               1 desired | 1 updated | 1 total | 1 available | 0 unavailable
StrategyType:           RollingUpdate
MinReadySeconds:        0
RollingUpdateStrategy:  25% max unavailable, 25% max surge
Pod Template:
  Labels:  app=nginx
  Containers:
   nginx:
    Image:        nginx
    Port:         <none>
    Host Port:    <none>
    Environment:  <none>
    Mounts:       <none>
  Volumes:        <none>
Conditions:
  Type           Status  Reason
  ----           ------  ------
  Available      True    MinimumReplicasAvailable
  Progressing    True    NewReplicaSetAvailable
OldReplicaSets:  <none>
NewReplicaSet:   nginx-55bd7c9fd (1/1 replicas created)
Events:
  Type    Reason             Age    From                   Message
  ----    ------             ----   ----                   -------
  Normal  ScalingReplicaSet  3m48s  deployment-controller  Scaled up replica set nginx-55bd7c9fd to 1
Since we have 2 nodes and you want to know on which node the pod is running on, you can issue the command: kubectl get pods -o=wide
ppaul@k8s2001:~$ kubectl get pods -o=wide
NAME                    READY   STATUS    RESTARTS   AGE     IP             NODE      NOMINATED NODE
nginx-55bd7c9fd-54pgz   1/1     Running   0          9m54s   192.168.17.3   k8s2003   <none>
We can see that Nginx is running on k8s2003.
WE have Nginx running but we can not access it for now. For us to be able to access it, we need to expose the service on port 80.The command to do that is
kubectl create service nodeport nginx --tcp=80:80
Output
ppaul@k8s2001:/etc/ssh/userkeys$ kubectl create service nodeport nginx --tcp=80:80
service/nginx created
By running kubeclt get svc we can see the Nginx service with assigned port of 30887
ppaul@k8s2001:/etc/ssh/userkeys$ kubectl get svc
NAME         TYPE        CLUSTER-IP     EXTERNAL-IP   PORT(S)        AGE
kubernetes   ClusterIP   10.96.0.1      <none>        443/TCP        17h
nginx        NodePort    10.105.111.0   <none>        80:30887/TCP   20s
To double check that Nginx is up and you can access the default page, login to the node on which the service is running (k8s2003) and curl 10.64.0.16:30887
papaul@k8s2003:/etc/network$ curl 10.64.0.16:30887
<!DOCTYPE html>
<html>
<head>
<title>Welcome to nginx!</title>
<style>
   body {
       width: 35em;
       margin: 0 auto;
       font-family: Tahoma, Verdana, Arial, sans-serif;
   }
</style>
</head>
<body>
---------
---------
</body>
</html>
You can also open a browser and enter 10.64.0.16:30887 it will take you to Nginx default page.
Now that we have our cluster setup and everything is working, let us work on some scenarios.
Scenarios
Example 1
In example 1 we are going to deploy a simple web app on 5 pods using the command line and explaining each line of the command.
Login to you master node and run the command below
kubectl run hello-world --replicas=5 --labels="run=load-balancer-example" --image=gcr.io/google-samples/node-hello:1.0 --port=8080
Explanation
hello-world  / name of deployment
replicas=5 / We want 5 pods (containers)
labels="run=load-balancer-example" / a labels is just a name you give to the deployment to be able to keep track
--image=gcr.io/google-samples/node-hello:1.0  / gcr.io/google-samples/= the url where to get the image from and node-hello:1.0  is the name of the image
--port=8080 / the port that this container exposes. If we do create a service to expose  this deployment, the service will use this port
Output:
papaul@k8s2001:~$ kubectl run hello-world --replicas=5 --labels="run=load-balancer-example" --image=gcr.io/google-samples/node-hello:1.0 --port=8080
kubectl run --generator=deployment/apps.v1beta1 is DEPRECATED and will be removed in a future version. Use kubectl create instead.
deployment.apps/hello-world created
By running the kuberctl get pods -o=wide we can see that we have the 5 pods running. 3 on k8s2002 and 2 on k8s2003
ppaul@k8s2001:~$ kubectl get pods -o=wide
NAME                           READY   STATUS    RESTARTS   AGE     IP              NODE      NOMINATED NODE
hello-world-6479dc48cb-65mft   1/1     Running   0          6m53s   192.168.2.2     k8s2003   <none>
hello-world-6479dc48cb-6wlrj   1/1     Running   0          6m53s   192.168.2.3     k8s2003   <none>
hello-world-6479dc48cb-cf2b2   1/1     Running   0          6m53s   192.168.3.3     k8s2002   <none>
hello-world-6479dc48cb-h2fpk   1/1     Running   0          6m53s   192.168.3.4     k8s2002   <none>
hello-world-6479dc48cb-w5f5n   1/1     Running   0          6m53s   192.168.3.2     k8s2002   <none>
nginx-55bd7c9fd-cxp8t          1/1     Running   1          4d19h   192.168.17.23   k8s2003   <none>
The next step is to create a service object that exposes the deployment hello-world. the command to do that is:
ppaul@k8s2001:~$ kubectl expose deployment hello-world --type=LoadBalancer --name=svc-hello-world
service/svc-hello-world exposed
Explanation
hello-world / name of deployment
--type=LoadBalancer / The type of service. We have ClusterIP, NodePort, LoadBalancer and ExternalName. in our case we pick LoadBalancer because we need to be able to balance traffic between the 5 pods (containers)
--name=svc-hello-world / the name we want to give to our service
- verification
papaul@k8s2001:~$ kubectl get svc svc-hello-world
NAME              TYPE           CLUSTER-IP       EXTERNAL-IP   PORT(S)          AGE
svc-hello-world   LoadBalancer   10.106.237.120   <pending>     8080:30155/TCP   4m15s
Do not worry about the EXternal-IP pending status for now. We can see that the port 8080 was exposed to port 30155 . To access the app, we will have to use port 30155 and not port 8080.
- Testing
ppaul@k8s2001:~$ curl k8s2002:30155
Hello Kubernetes!
ppaul@k8s2001:~$ curl k8s2003:30155
Hello Kubernetes!
Example 2
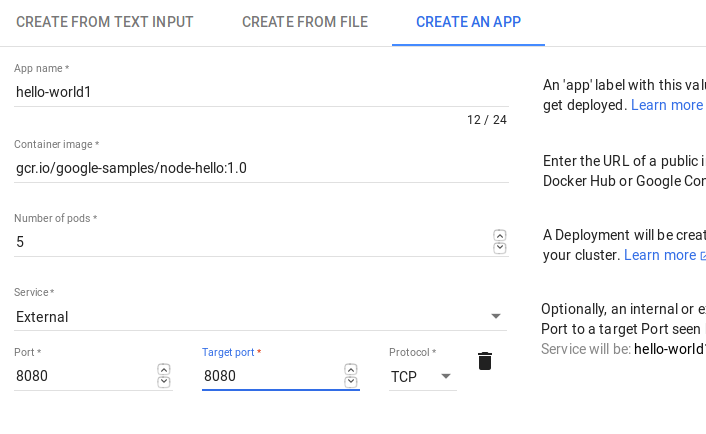
In example 2 we are going to re-do example 1 but using the dashboard. Open your dashboard, on the top right corner click on "create' then "CREATE AN APP"
deployment name = hello-world1
image url = gcr.io/google-samples/node-hello:1.0
Number of pods = 5
Service = External
Port = 8080
target port = 8080
Then click on "Deploy"
- Checking
papaul@k8s2001:~$ kubectl get svc
NAME              TYPE           CLUSTER-IP       EXTERNAL-IP   PORT(S)          AGE
hello-world1      LoadBalancer   10.103.65.169    <pending>     8080:32707/TCP   3m12s
kubernetes        ClusterIP      10.96.0.1        <none>        443/TCP          6d1h
nginx             LoadBalancer   10.100.156.7     <pending>     82:32238/TCP     58m
svc-hello-world   LoadBalancer   10.106.237.120   <pending>     8080:30155/TCP   46m
We see that the same app running on cluster with IP 10.103.65.169 is accessible on port 32707 and the one running on cluster ip 10.106.237.120 is accessible on port 30155
- Testing
ppaul@k8s2001:~$ curl k8s2002:32707
Hello Kubernetes!
ppaul@k8s2001:~$ curl k8s2003:32707
Hello Kubernetes!
Note: If you delete a pod on a deployment with replicas set to 5 for example, that pod will be recreate automatically.
Scale
Depending on your needs, you can decide to scale your deployment. You have 2 options to scale, scale up which will add mode pod(s) to your deployment and scale down which will remove pod(s) from your deployment.
We have seen that when the replicas = 5 and we have 2 nodes in our cluster, K8s distribute the load equally between the nodes ( 3 for k8s2002 and 2 for k8s2003) if the replicas was equal to let see 4, then k82002 will get 2 and k8s2003 as well.
In example 1, we have 3 pods running on k8s2002 and 2 on k8s2003.
ppaul@k8s2001:~$ kubectl get pods -o=wide
NAME                            READY   STATUS    RESTARTS   AGE   IP             NODE      NOMINATED NODE
hello-world-78f6dc68cf-c6qbk    1/1     Running   0          93m   192.168.3.5    k8s2002   <none>
hello-world-78f6dc68cf-dq9gn    1/1     Running   0          93m   192.168.3.7    k8s2002   <none>
hello-world-78f6dc68cf-glp59    1/1     Running   0          93m   192.168.2.5    k8s2003   <none>
hello-world-78f6dc68cf-ttkwh    1/1     Running   0          93m   192.168.3.6    k8s2002   <none>
hello-world-78f6dc68cf-xv75k    1/1     Running   0          20m   192.168.2.13   k8s2003   <none>
if we decide to scale up by adding 1 more pod, this pod will automatically be added to k8s2003.
We do have 3 options for scaling up
- Use the dashboard: the easy way
- Edit the deployment yaml file
- use the command line (CL)
Use the command line
ppaul@k8s2001:~$ kubectl scale deploy hello-world --replicas=6
deployment.extensions/hello-world scaled
- Checking
ppaul@k8s2001:~$ kubectl get pods -o=wide
NAME                            READY   STATUS    RESTARTS   AGE     IP             NODE      NOMINATED NODE
hello-world-78f6dc68cf-c6qbk    1/1     Running   0          104m    192.168.3.5    k8s2002   <none>
hello-world-78f6dc68cf-dq9gn    1/1     Running   0          104m    192.168.3.7    k8s2002   <none>
hello-world-78f6dc68cf-glp59    1/1     Running   0          104m    192.168.2.5    k8s2003   <none>
hello-world-78f6dc68cf-tqk9r    1/1     Running   0          3m46s   192.168.2.14   k8s2003   <none>
hello-world-78f6dc68cf-ttkwh    1/1     Running   0          104m    192.168.3.6    k8s2002   <none>
hello-world-78f6dc68cf-xv75k    1/1     Running   0          32m     192.168.2.13   k8s2003   <none>
Edit the yaml file
We are going to use the yaml file now to scale down back our cluster to 5 pods
kubectl edit deploy hello-world
This will open the yaml file for edit. Find the line that says replicas and change the value from 6 to 5 save and close the file.
- Checking
ppaul@k8s2001:~$ kubectl get pods -o=wide
NAME                            READY   STATUS    RESTARTS   AGE    IP             NODE      NOMINATED NODE
hello-world-78f6dc68cf-c6qbk    1/1     Running   0          110m   192.168.3.5    k8s2002   <none>
hello-world-78f6dc68cf-dq9gn    1/1     Running   0          110m   192.168.3.7    k8s2002   <none>
hello-world-78f6dc68cf-glp59    1/1     Running   0          110m   192.168.2.5    k8s2003   <none>
hello-world-78f6dc68cf-ttkwh    1/1     Running   0          110m   192.168.3.6    k8s2002   <none>
hello-world-78f6dc68cf-xv75k    1/1     Running   0          38m    192.168.2.13   k8s2003   <none>
Understand K8s yaml file
In this section we are going to break down the most important parts of the deployment and service yaml files to create a basic app
Deployment yaml
apiVersion: apps/v1
kind: Deployment
metadata:
  name: nginx-deployment       #name of of ddeployment
spec:
  selector:
    matchLabels:
      app: nginx-deployment
  replicas: 2                 #number of pods to create
  template:
    metadata:
      labels:
        app: nginx-deployment
    spec:
      containers:
      - name: nginx
        image: nginx:1.8     #which image to install
        ports:
          - name: http       # port name
            containerPort: 8081
Run the file.
kuberctl apply -f deployment.yaml
Output
ppaul@k8s2001:~$ kubectl apply -f deployment.yaml
deployment.extensions/nginx-deployment created
ppaul@k8s2001:~$ kubectl get pod
NAME                                READY   STATUS    RESTARTS   AGE     IP             Node      NOMINATED MODE
nginx-deployment-598886bfc7-nxl2g   1/1     Running   0          2m26s   192.168.3.36   k8s2002   <none>
nginx-deployment-598886bfc7-stt42   1/1     Running   0          2m26s   192.168.2.25   k8s2003   <none>
The only way to access the app here is by using the pod IP address from the node where it is running from. Login to k8s2003 and curl 192.168.2.25 and login to k8s200 an curl 192.168.3.36
output
ppaul@k8s2003:~$ curl 192.168.2.25
<!DOCTYPE html>
<html>
<head>
<title>Welcome to nginx!</title>
<style>
-------
To be able to access the app from the cluster, we need to create a service that exposes the port, (see next step)
Service yaml
The service below opens a specific port on all the Nodes(k8s2002 and k8s2003) and any traffic that is sent to this port is forwarded to the service. In this case, the service can me accessible from any node in the cluster by using any give node IP address follow by the open port.
---
apiVersion: v1
kind: Service
metadata:
  name: nginxtest
spec:
  selector:
      app: nginx-deployment  # app:nginx-deployment this needs to match the same name in  deployment,that's how the service will know how to route traffic
  ports:
  - port: 80
  type: NodePort
Run the file
kubectl apply -f service.yaml
Output
ppaul@k8s2001:~$ kubectl apply -f services.yaml
service/nginxtest created
ppaul@k8s2001:~$ kubectl get svc nginxtest
NAME        TYPE       CLUSTER-IP      EXTERNAL-IP   PORT(S)        AGE
nginxtest   NodePort   10.109.46.127   <none>        80:31863/TCP   68s
- Testing from k8s2001
ppaul@k8s2001:~$ curl k8s2002:31863   #You can use also k8s2003 IP address 10.64.0.15:31863
<!DOCTYPE html>
<html>
<head>
<title>Welcome to nginx!</title>
<style>
    body {
----

ppaul@k8s2001:~$ curl k8s2003:31863    #You can use also k8s2003 IP address 10.64.0.16:31863
<!DOCTYPE html>
<html>
<head>
<title>Welcome to nginx!</title>
<style>
    body {
----
This will work also if you run the test from any other node then k8s2001
Cleaning up
ppaul@k8s2001:~$ kubectl get deploy
NAME               DESIRED   CURRENT   UP-TO-DATE   AVAILABLE   AGE
hello-world        5         5         5            5           2d22h
hello-world1       5         5         5            5           2d21h
nginx-deployment   2         2         2            2           20h
The output above shows that the deployment nginx-deployment has 2 pods running. To delete this deployment you can just issue the command
kubectl delete deployment "deployment_name"

ppaul@k8s2001:~$ kubectl delete deploy nginx-deployment   #deploy=deployment you can also type the whole word deployment
deployment.extensions "nginx-deployment" deleted
There is no need to delete any pods. By deleting the deployment, it automatically delete all the pods. However, you need to delete the service associate to the deployment. That is why it is important when creating a service to label the service. In our case the service that was associate to the deployment nginx-deployment was ngnixtest
kubectl delete svc nginxtest # svc=service you can also type the whole word service
ppaul@k8s2001:~$ kubectl delete svc nginxtest
service "nginxtest" deleted
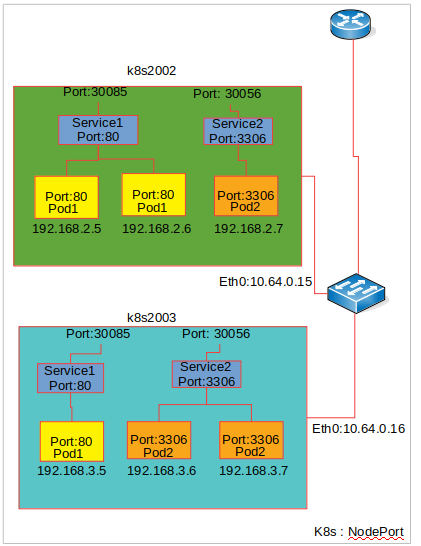
Understand type NodePort
Scenario 1 : Service map to a single pod
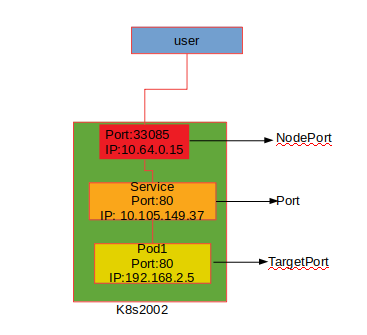
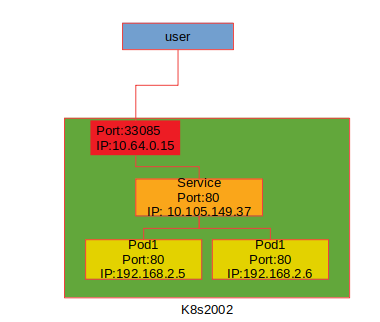
In the image above, we have one pod running a web app container on node k8s2002.The web app is running on port 80. we need to be able to access the web app from the 10.64.0.0/22 network. For that we have two options. The first option is to create a service with type = NodePort and select a port (default web port is 80). In this case, a "NodePort" will be automatically selected from the range 30000-32767. The service will then use the selector app:myapp to connect to the pod. If a targetPort was specified during the deployment, the service will know how to map to that port if not use option 2
In option two, you can specify which "NodePort" and map a service port to a target port on the pod.
- Option 1
apiVersion: v1
kind: Service
metadata:
  name: myapp-service
spec:
  selector:
    app: myapp
  ports:
   - port:80
  type: NodePort
- Option 2
apiVersion: v1
kind: Service
metadata:
  name: myapp-service
spec:
  selector:
    app: myapp
  ports:
   - targetPort: 80
     port:80
     nodePort: 33085
  type: NodePort
Scenario 2: Service map to multiple pods
we want to scale up by increasing the number of pod to 2 on our node. See image below.
Both Pods have the same label with the key app set to the value "myapp". The same label is use as a selector during the creation of the service. when the service is created, it looks for a matching pod with the label "myapp" it has 2 of them. The service then automatically selects all the two pods as end points to forward the external request from users. No additional configuration needs to be done for this to happen.
To balance the load across the two different pods, the service uses a random algorithm. The service acts as a build in load balancer to distribute load across different pods.
Scenario 3: Service map to multiple pods on different nodes
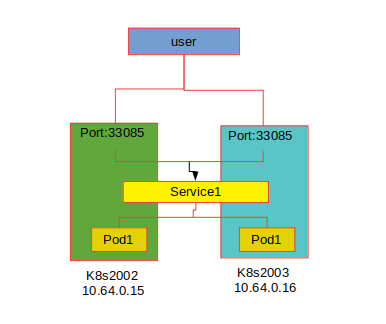
In this scenario like in scenario 2, there is no additional works that need to be done after creating the service. K8s will create a service that expends across all the nodes in the cluster and maps the target port to the same "NodePort" on all the node in the cluster. The application can then be access by using the IP address of any node in the cluster and using the same port number
curl http://10.64.0.15:33085
curl http://10.64.0.16:33085
or
curl http://k8s2002:33085
curl http://k8s2003:33085
Scenario 4: Node in cluster with no pods
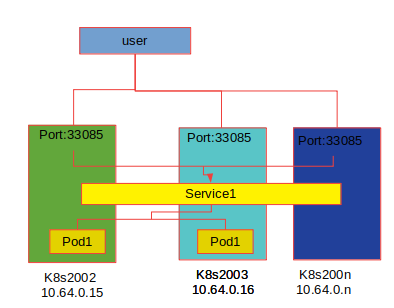
I have mentioned in scenario 3 that "K8s will create a service that expends across all the nodes in the cluster and maps the target port to the same "NodePort" on all the node in the cluster". This is true also even thought if there is a node in the cluster that doesn't have a pod running on it, the service will be created on that node. (See image below)
We can see in the image above that pod1 is not running on k8s200n but the service is created on k8s200n like on the other two nodes in the cluster. when the user uses 10.64.0.n to access the application, since there is no pod on k8s200n, the service knows how to send that request to the pod running on k8s2002 or k8s2003.
What we need to understand is that in any case, we have a single pod on a single node, multiple pods on a single node or multiple pods on multiple nodes. the service is created exactly the same way without any additional steps during the service creation.
When pods are removed or added, the service is automatically updated making it flexible and adaptive
Some Metrics
| System | Number of CPU | RAM | Disk | Number of pods |
| Master node | 2 | 2GB | 120GB | 15 kube-system |
| node1 | 1 | 2GB | 120GB | 4 |
| node2 | 1 | 2GB | 120GB | 4 |
With the setup above here are the metrics from grafana Note that all 3 nodes are VM's
Master Node
Node 1
Node 2
References
https://kubernetes.io/docs/tutorials/
Conclusion
In this tutorial, we setup a 3 nodes cluster with one master and 2 nodes. We also setup the dashboard which is very helpful to use when you are new on working with K8s. The tutorial was written to help those that wants to start to learn the basic of K8s with simple examples.
